Categories
Uncategorized

How to update firmware on Android Auto Wireless Adapter

After a few attempts at this I have finally worked out how to do this.

1) Plug the wireless adapter into a charger
Do no use your car data USB connection.
Either use a car cigarette lighter charger, or a wall charger in your house.

2) Once it is powered up, connect to the Wifi. Mine looks like “smartBox-A12B”

3) If asked, choose always connect.

4) Navigate on Chrome to http://192.168.1.101/ (or whatever your manual says)

5) At the bottom of the page, it will show “Online Update – Checking for updates”, and “Switch P2P”.
Given that we’re now connected to this device, there’s no internet access, so “Checking for updates” never works.
If you disconnect the Wifi it will detect new firmware (if there is any), but then if you click update it will fail because you are no longer connected to the device.
The way around this is to…

6) Click “Switch P2P”.

7) In your Android phone settings go to Connections -> Wi-Fi -> 3 dots in the top right -> Wi-fi Direct and it should find something like “smartBox-A12B”
You will also need to be connected to the internet some other way, like mobile internet or your home wi-fi.

8) Go back to Chrome and you should be able to refresh the http://192.168.1.101/ page and perform an update as you would expect.

9) The first time I did the update it zoomed up to 70%, but then slowly went up from there.

10) After you have updated, you might find that there are more updates. You will probably need to power off the device and power it back on again to get it to stop thinking that there
are updates. You will need to re-do the above process to get it back into Wi-fi direct mode if you need to update again.

11) You should now go into your Wi-fi settings and find the smartbox network, press and hold it and choose “Forget Network” as it is only needed for updating the firmware.
Categories
Uncategorized

Hiaku R1/Beta5 mirror

Here is a London, UK mirror of the files

https://zebadger.com/haiku-r1beta5-x86_64-anyboot.iso (64 bit)

https://zebadger.com/haiku-r1beta5-x86_gcc2h-anyboot.iso (32 bit)

$ sha256sum haiku-r1beta5-x86_*
22ae312a38e98083718b6984186e753d15806bd6ea44542144fdcef42c4dcb69 haiku-r1beta5-x86_64-anyboot.iso
bd6d5015ce1d94ab2c3fa2f4f685491249938bde9acc55345f76098eb2ea424f haiku-r1beta5-x86_gcc2h-anyboot.iso

Categories
Uncategorized

Virgin Media Hub 5 Modem Only Not Working

I have just renewed my Virgin Media contract and they sent me a new Hub 5 as part of the deal.

My old hub was in modem only mode, so I thought it would be easy to swap them out.

However, my router was failing to connect to it, saying “Not connected”. I tried many times but I could just not get it working. I could connect to the internet directly from the hub, but not via the router. I found a note about the 5x hub (which mine isn’t) that suggested taking the hub out of modem only mode and in the settings disabling UPNP, DMZ and DHCP, before switching back to modem mode.

I followed these instructions and sure enough, when I switched back to modem only mode my router connected immediately.

Sigh.

Categories
Uncategorized

Blood Pressure 5 Day Record Form

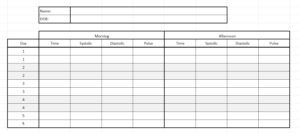
I’ve written a 5 day blood pressure record form for my father. The one that was provided by the doctor wasn’t very intuitive.

You can access it on Google Docs here : https://docs.google.com/spreadsheets/d/1pUDhr3YuVaerV4CJGScBGCSyO4KwNSNFO8rITQTj0rM/edit?usp=sharing

Categories
Uncategorized

Freetrade Dividend Overview Spreadsheet

If you have a Freetrade account and want to keep track of your dividends in a simple table / graph, then I have written a Google Spreadsheet to help.

Step Instruction
1 Got to the Activity Tab on the Freetrade app
2 Click the Share icon in the top right corner
3 Select all activity
4 Select Gmail, or similar, to email it to yourself
5 Clear everything in the Full Export tab
6 Open your export in Google Sheets, copy all data
7 Paste the data from the export at the first cell the Full Export tab
8 View your dividend overview on the Dividends tab

https://docs.google.com/spreadsheets/d/1kGhEDiDVKsY2kS_G10e3fthJacIkR77tGcMHmm5TQFo/

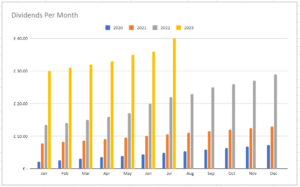
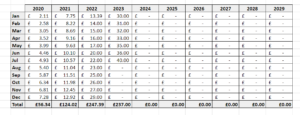
Automated overview of dividend payments
Graph of dividends per month, per year
Categories
Uncategorized

Frigate

I had a camera “front”.
I renamed it in the config to “front1” and added another camera called “front2”.
Once I was happy with my new higher resolution camera, I removed the old one and went back to just one camera in the config called “front”. I think that this caused all my recordings to disappear from disk.

However, the Frigate database seemed to think that they were still there. Deleting them all manually is somewhat tedious (especially because I had 29k of them!). So, I decided to delete them from the sqlite database with a command.

First I installed a sqlite client:

sudo apt install sqlite3

Then I worked out the date timestamp value that I needed by visiting Epoch Converter and picking the date time that I know I made a mess.

Yr Mon Day Hr Min Sec
2023- 6- 29 21 : 0 : 0 GMT
Human date to Timestamp
Epoch timestamp: 1688072400
Timestamp in milliseconds: 1688072400000
Date and time (GMT): Thursday, 29 June 2023 21:00:00
Date and time (your time zone): Thursday, 29 June 2023 22:00:00 GMT+01:00

I then copied the Timestamp in milliseconds into my delete command

$ sudo sqlite3 frigate.db
SQLite version 3.34.1 2021-01-20 14:10:07
Enter “.help” for usage hints.
sqlite> delete from event where start_time <= 1688072400; sqlite> .q

It took a few seconds, but dropped my events from 29k to 71.

Categories
Crypto

Scam video on YouTube advertising AMZ coin- PRE5RT AZM77X AZT33X ZAT44R AMA44X AMA55X XRM5T AZN66X AZN44X

Scam video on YouTube advertising AMZ coin-
There’s a video channel @CoinmarketcapEN which has 1M followers, but looks like it’s just a hijacked channel that has been rebranded to look like @CoinMarketCapOfficial.
They have 1 video, but their main page is full of playlists from the official channel, which helps to make it look legit.
Edit: New channel called “Coinmarketdaily” is doing the exact same thing

My attention was drawn to it watching financial videos and seeing comments mentioning first of these strings : , obviously they will switch to the 2nd, 3rd at some point in the future.

Edit : I’ll maintain a list of strings that they are using here:
PRE5RT AZM77X AZT33X
ZAT44R AMA44X AMA55X
XRM5T AZN66X AZN44X
AMZ2000X AZM1000X
AZW66X AZWR60
ETF1000X ETF2000X
ETF1000X ETF2000X
#ETF1000X #ETF2000X
AIZ500X AIZ300X
#AIZ500X #AIZ300X
AIZ500X$ AIZ300X$
AIZ500X$ AIZ300X$
AUT33X AWSTR6
AUT33X AWSTR6
AZMN3T AMCR7T AMCR4T
AMZK22

The current scam website where people are being directed to is :
https://amazonwallet.sale/presale
which has now been replaced with:
https://amazonwallets.co/presale/
which has now been replaced with:
https://www.amzlaunch.io/presale/

Categories
Linux

Scanning in Linux

I was having a mare trying to get scanning working on my USB HP Deskjet 2050.
Even though some of these settings are listed as defaults, it produces rubbish.

So I thought that I would document a working command!

Obviously you need to install the scan utilites
matt@server:~$ sudo apt install sane

Then list the devices:

matt@server:~$ scanimage -L device `hpaio:/usb/Deskjet_2050_J510_series?serial=XXXXXXXXXX' is a Hewlett-Packard Deskjet_2050_J510_series all-in-one

And use the output from above to specify the device:

scanimage -d "hpaio:/usb/Deskjet_2050_J510_series?serial=XXXXXXXXXX" --mode Color --resolution 200 --brightness 1000 --contrast 1000 -o scan9.jpg

Categories
Linux Security

Fail2ban not picking up sshd attacks

It wasn’t working for me, no matter what I tried.
The command
fail2ban-regex /var/log/auth.log /etc/fail2ban/filter.d/sshd.conf
was showing matches successfully.

In the end I ran these commands… I’m fairly sure it was just the RepeatedMsgReduction setting to off that fixed it though

dpkg-reconfigure tzdata
ln -s /usr/share/zoneinfo/Europe/London /etc/localtime

vim /etc/rsyslog.conf
#Change this line of "off" so we can see all messages
$RepeatedMsgReduction off

Then
service rsyslog restart

Categories
Crypto

Recovering from a wallet transfer mistake

The mistake

You sent money from Binance to another wallet, but chose the wrong network.

There are many options when transferring money around wallets and it’s quite tempting to choose the cheapest option, but that isn’t always right.  This example is where someone sent some USDT from their Binance wallet to what they thought was their USDT Wallet using the Blockchain app.  The user sent the money using Binance Smart Chain (BSC), but Blockchain.com do not support BSC.

LUCKILY, the Blockchain app allows you to view your private keys and even more luckily BSC is just a copy of ETH, so those private keys can be imported into a wallet that does support BSC.

Step 1 : Confirm you can actually recover from your mistake.

This is a lot of messing around, so make sure that you meet the recovery criteria before messing around.

You MUST meet both these conditions:

  1. You sent from Binance using BEP20 (BSC) to a ERC20 wallet.
  2. You have access to the private keys of the destination wallet (if not you might be able to raise a support request with your wallet provider).

Step 2 : Find your private key for your destination wallet

Warning: Never give your private keys to anyone.  Do not email them.  Do not store them unencrypted on the internet.

Examples of wallets where you can get to your private keys.

Blockchain Wallet (from Blockchain.com or the Blockchain app)
  •  Visit https://login.blockchain.com/ and login.
  • If you don’t know how, it’s really easy if you have a webcam on your PC/Mac, just choose “Login my mobile” and on the mobile app, use the top right menu option “Log in to Web Wallet”.
  • On the blockchain website, the far right settings icon has the option of Wallets and Addresses, pick that.
  • Click the Ethereum button
  • Click View your Private Keys.
Exodus Wallet

For Exodus wallet view this article

Step 3 : Install Metamask wallet

You can install this as a browser plug-in or Mobile app for Apple or Android

Go through the set-up procedure, secure your recovery key and maybe view the tutorial.  Note that the recovery key is only for the new wallet that Metamask creates for you when you install the app.

Step 4 : Import your private key into Metamask wallet

When viewing your wallet, click/press the circle above “Account 1” that looks like it could be a profile picture.  Choose “Import an Account” and paste your private key from Step 2 into it and then click “IMPORT”.

Step 5 : Add Binance Smart Chain network to Metamask wallet

Press/click the menu button on the top left, press Settings, scroll down and pick “Networks”, choose “Add Network” and enter the following:

Network Name: Binance Smart Chain
New RPC URL: https://bsc-dataseed.binance.org/
ChainID: 56
Symbol: BNB
Block Explorer URL: https://bscscan.com

Then click Add.

Note: To switch between Ethereum Network and Binance Smart Chain – just click the top of the app, where it says “Wallet”, you might need to scroll down to see the Binance Smart Chain.

Step 6 : Make sure Metamask is pointing the Network and Wallet

Make sure that you are now using the right Network and the imported wallet (Account 2)

Click/press the very top of the Metamask app where it says “Wallet Ethereum Main Network”.  Scroll down and choose “Binance Smart Chain”

Click the menu button on the top left and click on “Account 1” and choose “Account 2”.

Step 7 : Add your missing coin to the BSC wallet on Metamask

At the bottom of the Metamask wallet, click “+ADD TOKENS”.  Search for the token that you are missing (eg. USDT) and then click “ADD TOKEN”.

You might need to restart Metamask in order to see your balance.

Step 8 : Now get it to where you wanted it

There are a number of ways to do this, but the easiest is to send it back to Binance.  In Binance, when you look for your Deposit address, make sure that you pick BEP20 (BSC).

After you have done this, send it to the right place using the network that BOTH wallets support.

NOTE: this was quite complicated to work out, so if this helps you and you would like to send me a tip my wallets are:

BTC
1Gxjf2crehcSDRQh4dUkGD4wcg8AartTqm

ETH (ERC20 or BEP20)
0x4471e4ab83069fd926ba418a1731766b4699e313

BNB (BEP2)
bnb136ns6lfw4zs5hg4n85vdthaad7hq5m4gtkgf23
Memo: 102292475